Holiday Decorating for Small Spaces in Charlotte NC


Looking for some great ideas on decorating small spaces this holiday in your home in Charlotte, NC? 

Thanks to Better Homes and Gardens they have some great photos and ideas below on how to decorate your small spaces for the holidays.


Hang Festive Plates
Dish up cheer with this simple holiday plate display. Cut letters from red paper or purchase stick-on vinyl letters to adhere to white plates. Removable mounting strips or plate hangers make this stunning seasonal sentiment easy to dismantle.


Use Window Space
Simplicity is key for small-space decorating.
White pillar candles, placed on a silver tray, add elegance to a
windowsill. Two faux dwarf evergreens, wrapped in burlap, add a bit of color to the wintry scene.


Fill a Corner
Nooks, crannies, shelves, bookcases: All are
great spots for diminutive seasonal decor.
If there's no space for a full tree, put a single dwarf version -- with a few presents --
on a midheight shelf. In place of lights, decorate with small-scale ornaments.


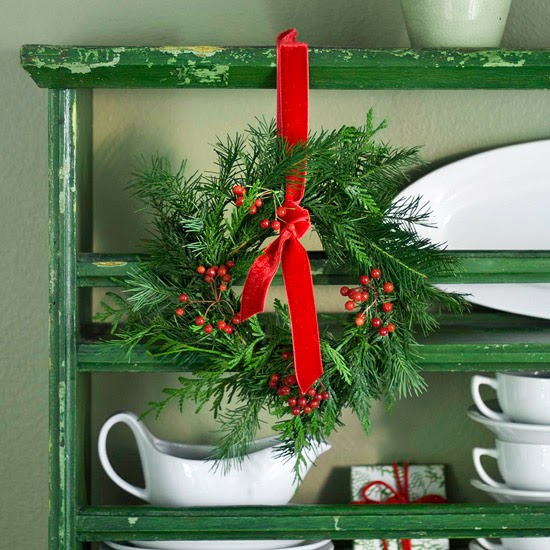
Decorate with Small Wreaths
Large and impactful are typical design credos
for wreaths, but small can be equally as mighty. Hang a mini wreath with a
velvet or satin ribbon from shelves or drawer pulls.


Use Space by the Stairs
A small table by the stairs is a prominent
small-space spot to start your Christmas merriment.
Add a little, lightly decorated tree and a modest display to the tabletop. To
give the evergreen a bit of height, place in a tall silver vase.


Put Home Accents to Work
Got a pretty lamp with an open base? Fill it with ornaments. A kitchen bowl could do the same work in a small space.


Tonia Mosteller and Peggy Johnson, Holiday & Event decorators of Charlotte, NC can help you decorate your home for the holidays.

Don't fall behind, call us today to schedule your holiday decorating consultation! 


Christmas Holiday Event Decorations 2013

Holiday Decorating photo from Pier One


2013 Sneak peak Holiday and Christmas Decorations! Look what is coming this holiday season! 


Pier One has a sneak peak of their holiday decorations to get you ready for the upcoming holidays! After all, 48 more days before "fall" is here (my favorite season), and the months that end with "ber". When school starts back in August...the fall months follow right after, and the seasonal holidays to follow. It's always great to be an early bird, and start making your holiday shopping and decorating list, to prepare for your family and friends to visit during the holidays and Christmas. 

I am so excited to think about the fall months, and all the excitement and decorating that follows. Check out Pier One and be sure to check out the holiday - seasonal - event - Christmas decorators in Charlotte, NC for some great holiday and Christmas decorating tips! 


Stay tuned to my holiday decorating blog, because it will be filled with lots of new holiday, seasonal, event, Christmas decorating information, sure to make your holidays sparkle and festive in 2013!  


2012 Reflection


WELCOME 2013!

THANK YOU 2012 FOR THE BEST YEAR OF MY LIFE!  


As Innovative Interiors - Holiday & Event Decorating wrapped up an amazing year with holiday and event decorating, redesign/design, and home staging projects.  Now, I want to take a moment and reflect on how much my clients have meant to me and to my decorating team. We are forever grateful for your business and relationships! My team and I look forward to many more years of service with you. 

I feel blessed beyond measure in so many ways to have the opportunity to do what I love for amazing people who are gracious us.  Many thanks to all of you who have become a part of the Innovative Interiors - Holiday & Event Decorating family.  You have made my passion and love...my dream a reality!  Thank you! :)

At Innovative Interiors - Holiday & Event Decorating we wish you all 
an amazing new year filled with good health, cheer,
 love, prosperity, and lots of laughter. 

We look forward to working with you in this new year! 

Blessings to all! 

Christmas Holiday Decorating Tips


It's the most wonderful time of year. 

Christmas trees, garlands, lights, wreaths, and holiday decorations
hung every where in Charlotte, North Carolina and surrounding areas.


 Christmas Holiday Decorating Tips:
Nothing welcomes friends and family to your home during the holiday’s like beautiful front door decorations! They are like a great party invitation…they set the tone of what the interior will hold during this holidays. As you know front doors can be all colors and styles. Adding your personality to your front door decorations can create a festive holiday cheer for everyone to see when they enter into your home.

Holiday Decorating Tip For Home Sellers: For home sellers, if you are selling your home, keep your holiday decorating tasteful and classic. Remember you want to draw the potential buyer...you don't want them to go flying by like a wild pack of reindeer.


It's certainly beginning to look like Christmas at our home. 
Merry Christmas and Happy Holidays from our home to yours.

Our Thanks-Giving


Thanksgiving is more than decorating my home for the holiday season or having that Thanksgiving feast. Starting on the first day of this month, in my family we like to take a moment each day during the month of November and list what we give thanks for on that day. Thanks-giving in our family....is to spend time with our family and friends, to give thanks, give to others, create a lifetime of cherished memories, and to express our gratitude for life itself.

~ Giving thanks, 1st day of November. Today, I'm thankful for my family and friends, the air in my lungs, clothes on my back, and the amazing news my Uncle just shared with us!


Decorating Thanksgiving Tables

Gather your family and friends for a Thanksgiving feast this holiday season. Here are some great decorating table settings and centerpiece ideas to dress up your table from CountryLiving.com. Thanks Country Living for these beautiful photos and great useful tips on how to dress up and decorate our dining room tables for Thanksgiving. 

Photo Centerpiece
Photo Display: Before the holiday, invite your guests to send you copies of family photos that you can then spray-mount to card stock. To age contemporary color digital photos, print them in sepia.

Pear Placecard: At each place setting, set out a Bartlett pear. From cream-colored card stock or manila file folders, cut out strips and write guests' names in gold or brown ink. Affix each with a ball-head sewing pin.

Candle Tray: A collection of brass candlesticks in varying heights also provides visual interest. The placement of the photos, which are nestled in a tray of nuts, is varied, too. Keep the candles the same length.

 Exquisite Table Dishes:
Family china may steer the table's theme, but introducing a few simple, con-temporary pieces can create an entirely new look that is as personal as it is inviting.

Table: Favorite items like colorful linen napkins or a family heirloom can inspire the overall look. Employ a sideboard to keep plates and glassware handy for the second course and the dining table uncluttered. Serving a sumptuous Thanksgiving feast can be an exciting prospect, especially when the entertaining is fuss-free. All it takes is a little planning and recipes that are delicious and simple to prepare. You too can host an unforgettable Thanksgiving.


Dessert Table (Oh yes, we must all have a dessert table for our Thanksgiving feast). Just wouldn't be Thanksgiving without some homemade pumpkin pies. ;)

This holiday, expand your entertaining space and move part of the party out of the dining room.

Step 1: Rethink your surfaces. Clear a side table or desktop in another room to create a cocktail bar or dessert station.

Step 2: Vary the height and size of your serving pieces. Incorporate footed compotes, trifle bowls, cake stands, and stacks of dessert plates to add dimension and visual interest to your entertaining surface.

Step 3: Corral your ice bucket, glassware, and libations on a tray that can be easily removed when coffee and tea are served.

Step 4: Mix and match your favorite china and glassware collections at the dessert station. Don't worry about continuing the theme you create on your main table.


Child's Play (When weather permits create a great outdoor dining setting for kids to enjoy on Thanksgiving and if mother nature is not on your side, then move it indoors.)

We all fondly recall holidays spent at the kids' table, joking with cousins and passing vegetables to the dog when no one was looking. To create special memories for the next generation, forgo the boring card table in favor of a fun, kid-friendly setup. In good weather, set the table outdoors (within your sight, of course), and offer plenty of treats and activities to keep boredom and squabbles at bay.

SETTING THE KIDS' TABLE

Giving Tree: Have the kids write down what they're thankful for this year on stamped tags, then tie to branches of fall foliage. Vase: Villeroy & Boch.

Sweet Treats: Thanksgiving-themed chocolate turkeys and lollipops make winning favors for tots. Glasses: AOH Design. Chocolate: Bissinger's.

Fun for All: Fill gift bags with rubber stamps and pads, then lay parchment paper on the table so the kids can play. Table: Pottery Barn Kids.

Happy Thanksgiving from our home in Charlotte, NC to your home where ever it may be. 

How To Add Christmas Lights To Your Tree


As we prepare our homes and businesses in the Charlotte, NC and greater metro area for the holidays, we may find ourselves wondering. "I'm stumped when it comes to lighting my Christmas tree? There are many ways to add lights to your Christmas trees but check out these great tips from BHG.com.  Professionals will show you how to light your tree efficiently and beautifully for the Christmas holiday season.


  • Consider using miniature clear (white) lights for your base lighting, then add strands of the new cool-burning large bulbs for color and variety. Or, add sets of novelty lights, such as flicker-flames, flashing lights, bubble lights, or other shapes.
  • Buy lights with the same kind of plug, either stacked (like the white plugs above) or end to end (like the green plugs). Christmas tree lights are either stacked (like the white plugs in photo) or end to end, also called string to string (like the green plugs). Check the boxes of lights before you buy to make sure they're all compatible. 
  • By using stacked plugs, you can join more strands than you can with end-to-end type plugs. Be sure to check the box for the manufacturer's recommendations, however. Usually you can string together three 100-light strands or six 50-light strands.
  • For safety's sake, never plug more than two extension cords together. Instead, buy them in the lengths you need and make sure they can handle the wattage of the bulbs.Make sure the wattages of all the lights you use are the same; this prevents power surges and prolongs the life of the bulbs. 
  • Plug in the lights before you remove them from the box so you can see if they work before you put them on the tree.Instead of wrapping the lights around the tree in a maypole style, mentally divide the tree into three triangular sections, from top to bottom, around the tree's cone.
  • Plug in the first string of lights and nestle the last bulb on the string at the top of the tree next to the trunk. Weave the lights back and forth across the triangle, being careful not to cross the cord over itself. When you reach the end of the first string, plug in the next set and continue weaving the lights back and forth until you reach the bottom, connecting no more than 300 lights end to end. Repeat this procedure for the remaining triangles.
  • Step back from the tree and look at it with your eyes crossed, or squint until the tree is blurry. Wherever you see dark holes on the tree, rearrange the lights as necessary to fill in. To remove the lights without tangling them, work in reverse.
  • Artificial trees come in sections that open like an umbrella. If you use miniature lights, you can wrap them around the branches and leave them on permanently. Just be sure to light each section separately (that is, don't cross a section, or point of assembly, with a strand of lights).
  • Use 50-light strands: the 100-light strands are two 50-light strands wired together, and the 50-light strands are easier to work with as you wrap the tree branches. In addition, the 50-light sets are less likely to burn out or have electrical problems. 

For Subdued Lighting:


Photo 1
  • Use about 12 boxes of 50-light strands for a 6-foot tree and about 20 boxes for an 8-foot tree.
  • Begin at the bottom of the tree close to the trunk. Allowing some slack or leader cord in the first strand of lights, separate the cord near the first bulb so it forms a loop. Slip the loop over one of the branchlets or greens near the trunk, and wrap the cord a few times around the green to secure it.


Photo 2

  • Pull the string of lights taut to the tip of the branch, then work back toward the trunk, wrapping the cord over itself and the branch.
  • Separate the cord again when you reach the trunk, and slip the cord over a branchlet to secure it. Carry the cord over to the next branch, wrap it around a green near the trunk, and pull it out to the tip. Wrap the cord over itself and the branch as before.
  • Continue wrapping branches in this manner until you come to the end of the string. Plug in the next set, and keep going until you reach the point where the tree comes apart. Work any extra lights back along the branch rather than crossing the section. When you wrap the top section of the tree, don't wrap the lights around as many branches so the tree will look evenly lit from top to bottom.

For Moderate Lighting:

Photo 3
  • Use 20 boxes of 50-light strands for a 6-foot tree and 30 boxes for an 8-foot tree. Follow the same procedure as for subdued lighting, but wrap the cord around some of the greens along the branch as you work back toward the trunk.
For Showcase Lighting:
  • Use 40 boxes of 50-light strands for a 6-foot tree and 80 boxes for an 8-foot tree.
  • Wrap the cord around every green as you work back along the branch.
  • If you use floodlights to show off outdoor evergreens, use white, blue, or green lamps. Red, yellow, amber, and pink lamps will make the trees look a muddy brown.
  • Don't try to hang strings of lights from the eaves with cup hooks -- in a strong wind, the wires may swing loose. Instead, use plastic gutter clips that hook onto the gutter and hold the wire tightly in place. Look for packages of gutter clips in crafts stores and hardware stores, near the tree lights and supplies.
  • Be sure you have outdoor electrical sockets to plug into when you use outdoor lights.
  • Don't worry about hiding the electrical cords -- just keep them organize neatly, and no one will notice them.

Thanks BHG.com for these great "How To Add Christmas Lights To Your Tree" this holiday season

Happy Holidays from our homes in Charlotte, NC to your homes.